
This chapter covers these topics:
Using the configuration menus
You can access the MAX configuration menus in a VT100 emulation window from a computer connected to the Control port, or from a Palmtop Controller, as described in Starting up the MAX. When you see the configuration menus, you have established a Console session.
You can also establish a Console session from any Telnet workstation by opening a Telnet session with the MAX. From a Telnet session you can perform all of the configuration, diagnostic, management, and other functions that could be performed from a computer connected to the MAX Control port. See About MAX passwords for related information.
You can also use the Rem Mgmt command to enable a caller at the far end of an AIM or MPP call to access the MAX configuration menus.
The main edit menu
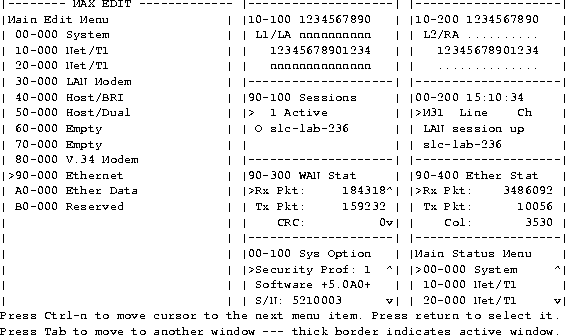
The configuration interface consist the Main Edit Menu and eight status windows. The left part of the screen is the Main Edit Menu, which is used to configure the MAX. The items listed in the Main Edit Menu differ depending on the system configuration. The Empty items represent expansion slots that do not contain a card. See Understanding menu numbers for related information.
Figure 4-1. MAX 6000 series configuration menus
Making a menu or status window active
You can interact with only one display at a time. The active display has a thick double line border on the left, right, and top sides. In Figure 4-1, the 10-100 status display is active (near the top-middle of the screen).
If you press the Tab key, the thick double lines move to 00-200, the next screen to the right. If you continue pressing the Tab key, you activate each window from left to right and down, until you reach the last display in the lower right-hand corner. Back-Tab or Ctrl-O moves you in the opposite direction.
Opening menus and profiles
The Main Edit Menu contains a list of menus, each of which can contain profiles and submenus. In the menu that is currently open, the cursor character (>) points to one item in the menu. To move the cursor down, press Ctrl-N (next) or the down-arrow key. To move it up, press Ctrl-P (previous) or the up-arrow key. (Some VT100 emulators do not support the use of arrow keys.) For a complete list of key combinations used to navigate the interface, see Table 4-1.
Main Edit MenuTo open a menu, move the cursor to the menu's name and press Enter. For example, press Ctrl-N until the cursor points to 90-000 Ethernet, and press Enter. The Ethernet menu opens.
00-000 System
>10-000 Net/T1
20-000 Net/T1
30-000 Empty
40-000 Empty
50-000 V.34 Modem
60-000 V.34 Modem
70-000 Net/T1
80-000 V.34 Modem
90-000 Ethernet
A0-000 Ether Data
b0-000 Serial WAN
90-000 EthernetThe Ethernet menu contains submenus and profiles related to network functionality, such as bridging, routing, WAN connections, and so forth. The Mod Config Profile in this menu relates to the configuration of the Ethernet interface itself, as shown next.
90-100 Connections
90-200 Names/Passwords
90-300 Bridge Adrs
90-400 Static Rtes
90-500 Filters
90-600 Firewalls
90-700 Frame Relay
90-800 Answer
90-900 SNMP Traps
90-A00 IPX Routes
90-B00 IPX SAP Filters
90-C00 Mod Config
      90-B00 Mod Config

          Module Name=

          Ether options...

          WAN options...

          SNMP options...

          OSPF options...

          OSPF global options...

          Route Pref...

          TServ options...

          Bridging=No

          Shared Prof=No

          Telnet PW=

          RIP Policy=Poison Rvrs

          RIP Summary=Yes

          ICMP Redirects=Accept

          BOOTP Relay...

          DNS...
Opening edit fields
To open an edit field for a text-based parameter (such as a password, for example), move the cursor to that parameter and press Enter. An edit field opens, delimited by brackets, as shown for the Telnet PW parameter, next.
      90-B00 Mod Config

          Module Name=

          Ether options...

          WAN options...

          SNMP options...

          OSPF options...

          OSPF global options...

          Route Pref...

          TServ options...

          Bridging=No

          Shared Prof=No

          Telnet PW:

          [ ]


          ICMP Redirects=Accept

          BOOTP Relay...

          DNS...
A blinking text cursor appears in the brackets, indicating that you can start typing text. If the field already contains text, it is cleared when you type a character. To modify only a few characters of existing text, use the arrow keys to position the cursor and then delete or overwrite the characters.
Setting enumerated parameters
An enumerated parameter is one for which there is a set of predefined values.You modify it by simply placing the cursor beside the parameter and typing the Enter, Return, or the Right-Arrow key until the proper value appears. Saving your changes
When you exit a profile, you are prompted to confirm that you want to save changes.
EXIT?You can save the profile values by choosing the Exit and Save option and pressing Enter, or by pressing 2.
>0=ESC (Don't exit)
1=Exit and discard
2=Exit and accept
In the Palmtop Controller, each menu displays only four lines, and each line displays a maximum of 20 characters. The Palmtop Controller screen contains a single display.
Main Edit MenuThe process of editing from the Palmtop Controller is nearly identical to the process of editing from the Control Monitor, except that the Right-Arrow key replaces the functions of the Enter/Return key. That is, after you position the cursor (>) in front of a parameter, you must press the Right-Arrow key to begin to edit. In the window shown immediately below, the cursor is in front of the Name parameter:
>00-000 System
10-000 Net/...
20-000 Host/...
21-101 Albuquerque+ OWhen you press the Right-arrow key, an edit field opens, and the current value is shown within the brackets:
>Name=Mark
Dial #=555-1212
Call Type=AIM
21-101 Albuquerque+ OSee Opening edit fields for more details about how to enter text.
Name:
[Mark]
About MAX passwords
The MAX has up to nine security levels, each of which is defined in a Security Profile. When shipped from the factory, all nine levels are wide open, with no defined restrictions. To see the list of Security Profiles, open the System menu in the Main Edit Menu, and then select Security and press Enter.
00-300 SecurityWhenever the MAX is powered on, it activates the first Security Profile in this list, which is always named Default and always has no password. One of the first thing most administrators do is to reset the privileges in the Default profile to restrict what can be done by anyone accessing the MAX configuration menus. This is an important four-step process:
>00-301 Default
00-302
00-303
00-304
00-305
00-306
00-307
00-308
00-309 Full Access
To activate the Full Access Security Profile, press Ctrl-D. A context-sensitive menu, called the DO menu, is displayed.
90-C00 Mod ConfigIn the DO menu, press P (or select P=Password). The list of Security Profiles will be displayed. Select Full Access and press Enter. The MAX prompts for that profile's password.
DO...
>0=Esc
P=Password
C=Close TELNET
E=Termsrv
D=Diagnostics
00-300 SecurityType the password and press Enter to accept it. (We recommend that you modify the Full Access Profile to assign a password other than the default "Ascend" as soon as possible.)
Enter Password:
[]
Press > to accept
A message states that the password was accepted and the MAX is using the new security level, or if the password you entered is incorrect, you are prompted again to enter the password.
Special display characters and keys
The following characters have special meaning within the displays:
The MAX displays the submenu when you select the menu option.
Understanding menu numbers
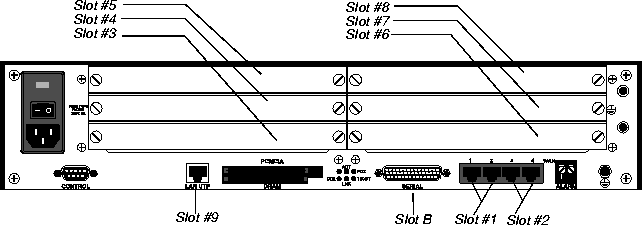
The MAX has with four built-in T1 or E1 lines and a V.35 serial port for WAN access. It also has eight expansion slots, which can support additional bandwidth (BRI lines), AIM ports modules to support videoconferencing, or digital modems to support analog modem connections over digital lines. 
Figure 4-2. Slot and port numbering in the MAX 6000 series
00-000 System
      00-100 Sys Config
      00-200 Sys Diag
      00-300 Security
      00-400 Destinations
      00-500 Dial Plan
10-000 Net/T1 (Net/E1)
      10-100 Line Config
      10-200 Line Diag
20-000 Net/T1 (Net/E1)
      20-100 Line Config
      20-200 Line Diag
Main Edit MenuNow that you understand the MAX user interface, proceed to the MAX ISP & Telecommuting Configuration Guide.
00-000 System
10-000 Net/T1
20-000 Net/T1
30-000 Host/Dual
40-000 Host/BRI
50-000 Net/BRI
60-000 BRI/LT
70-000 V.34 Modem
80-000 V.110
90-000 Ethernet
A0-000 Ether Data
B0-000 Serial WAN
Copyright © 1998, Ascend Communications, Inc. All rights reserved.