
This chapter covers these topics:
Introduction to Ascend bridging
This section provides an overview of packet bridging and explains how the MAX brings up a bridging connection.
Routers have other advantages over bridging. Because they examine packets at the network layer (instead of the link layer), you can filter on logical addresses, providing enhanced security and control. In addition, routers support multiple transmission paths to a given destination, enhancing the reliability and performance of packet delivery.
How a bridged WAN connection is initiated
When the MAX is configured for bridging, it accepts all packets on the Ethernet and forwards only those that have one of the following:
0000D801CFF2If the MAX receives a packet whose destination MAC address is not on the local network, it first checks its internal bridge table (for a description of the table, see Transparent bridging). If it finds the packet's destination MAC address in its bridge table, the MAX dials the connection and bridges the packet.
If the address is not specified in its bridge table, the MAX checks for active sessions that have bridging enabled. If there are one or more active bridging links, the MAX forwards the packet across all active sessions that have bridging enabled.
Broadcast addresses
A broadcast address is recognized by multiple nodes in a network. For example, the Ethernet broadcast address at the physical level is:
FFFFFFFFFFFFAll devices on the same network receive all packets with that destination address. When configured as a router only, the MAX discards broadcast packets. When configured as a bridge, it forwards packets with the broadcast destination address across all active sessions that have bridging enabled.
ARP broadcast packets that contain an IP address specified in the bridge table are a special case. For details, see Configuring proxy mode on the MAX.
How the MAX establishes a bridged connection
The MAX uses station names and passwords to sync up a bridging connection, as shown in Figure 8-1.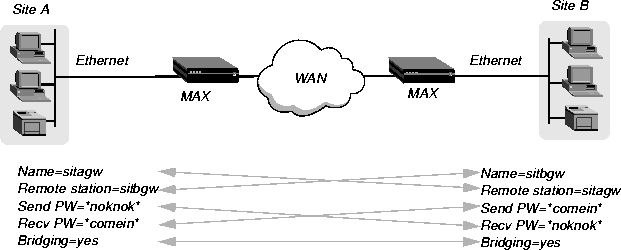
Figure 8-1. Negotiating a bridge connection (PPP encapsulation)
Enabling bridging
The MAX has a system-wide bridging parameter that must be enabled for any bridging connection to work. The Bridging parameter directs the MAX unit's Ethernet controller to run in promiscuous mode. In promiscuous mode, the Ethernet driver accepts all packets, regardless of address or packet type, and passes them up the protocol stack for a higher-layer decision on whether to route, bridge, or reject the packets. (Even if no packets are actually bridged, running in promiscuous mode incurs greater processor and memory overhead than the standard mode of operation for the Ethernet controller.)
Ethernet
      Mod Config
            Bridging=Yes
Managing the bridge table
To forward bridged packets to the correct destination network, the MAX uses a bridge table that associates end nodes with particular connections. It builds this table dynamically (transparent bridging). It also incorporates the entries found in its Bridge profiles. Bridge profiles are analogous to static routes in a routing environment. You can define up to 99 destination nodes and their connection information in Bridge profiles. Transparent bridging
The MAX is a transparent bridge (also termed a learning bridge). It keeps track of where a particular address is located, and of the Connection profile that specifies the interface to which the packet should be forwarded. As it forwards a packet, the MAX logs the packet's source address and creates a bridge table that associates node addresses with a particular interface.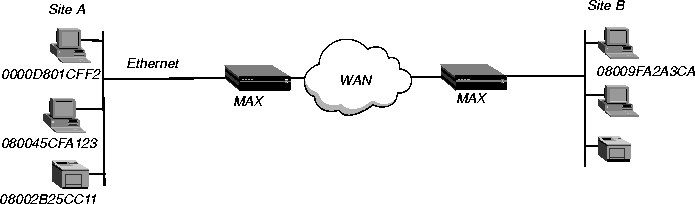
Figure 8-2. How the MAX creates a bridging table
0000D801CFF2 SITEAEntries in the MAX unit's bridge table must be relearned within a fixed aging limit, or they are removed from the table.
080045CFA123 SITEA
08002B25CC11 SITEA
08009FA2A3CA SITEB
Configuring bridged connections
Bridged connections require both Answer and Connection (or Name) profiles settings. They also require a method of recognizing when to dial the connection, which may be the dial-on-broadcast feature or a Bridge profile (Ethernet > Bridge Adrs). If a connection has an associated Bridge profile, it does not need dial-on-broadcast. You can define up to 100 Bridge profiles.
Ethernet
      Answer
            PPP options...
                  Bridge=Yes
                  Recv Auth=Either
Ethernet
      Connections
            Station=farend
            Bridge=Yes
            Dial Brdcast=No
            IPX options...
                  NetWare t/o=N/A
                  Handle IPX=Client
Ethernet
      Names / Passwords
            Name=Brian
            Active=yes
            Recv PW=brianpw
EthernetFor more information on each parameter, see the MAX Reference Guide.
Bridge Adrs
Enet Adrs=CFD012367
Net Adrs=10.1.1.12
Connection #=7
Station name and password
Name and password authentication is required, as described in How the MAX establishes a bridged connection.
Bridging and dial broadcast in a Connection profile
Bridge specifies that the Connection will bridge packets at the link level, provided that a method of bringing up the connection exists. Either the Connection profile must be specified in a static bridge table entry or Dial Brdcast must be turned on. See How the MAX establishes a bridged connection.
IPX bridging options
See IPX bridged configurations.
Names and passwords
The MAX uses station names and passwords to sync up a bridged connection. These may be provided in a Connection profile, a Name profile, or an external authentication profile. Bridge profile parameters
If a Connection profile does not use dial broadcast, it must have a bridge table entry for the MAX to be able to bring up the connection on demand. The Bridge profile defines a bridge table entry by specifying three parameters: Ethernet address
Each bridge table entry specifies an Ethernet (node) address that is not on the local segment. See Physical addresses and the bridge table for details on Ethernet addresses.
Network address
If you are bridging between two segments of the same IP network, you can use the Net Adrs parameter in a Bridge profile to enable the MAX to respond to ARP requests while bringing up the bridged connection. See Configuring proxy mode on the MAX.
Connection number
You associate bridge profiles with one Connection profile, which the MAX uses to bring up the connection to the specified node address. You specify a Connection profile by the unique portion of its number in the Connections menu. Example bridged connection
An AppleTalk connection at the link level requires a bridge at either end of the connection. This is unlike a dial-in connection using AppleTalk Remote Access (ARA) encapsulation, in which the MAX acts as an ARA server negotiating a session with ARA client software on the dial-in Macintosh.

Figure 8-3. An example connection bridging AppleTalk
To configure the site A MAX for a bridged connection:
Ethernet
      Answer
            PPP options...
                  Bridge=Yes
                  Recv Auth=Either
EthernetNote: Dial Brdcast is not needed because of the Bridge profile configured next.
Connections
profile #5...
Station=SITEBGW
Active=Yes
Encaps=PPP
Bridge=Yes
Dial Brdcast=No
                  Encaps options...
                        Send Auth=CHAP
                        Recv PW=localpw
                        Send PW=remotepw
Ethernet
      Bridge Adrs
            Enet Adrs=0080AD12CF9B
            Net Adrs=0.0.0.0
            Connection #=5
Ethernet
      Answer
            PPP options...
                  Bridge=Yes
                  Recv Auth=Either
EthernetNote: Dial Brdcast is not needed because of the Bridge profile, configured next.
Connections
profile #2...
Station=SITEAGW
Active=Yes
Encaps=PPP
Bridge=Yes
Dial Brdcast=No
                  Encaps options...
                        Send Auth=CHAP
                        Recv PW=remotepw
                        Send PW=localpw
Ethernet
      Bridge Adrs
            Enet Adrs=0CFF1238FFFF
            Net Adrs=0.0.0.0
            Connection #=2
These are the related parameters:
Ethernet
      Mod Config
            Ether options...
                  IPX Frame=802.2
EthernetHere is some background information about these parameters:
Connections
Route IPX=No
IPX options...
Handle IPX=Client
NetWare t/o=N/A
Route IPX
If you set Route IPX to Yes in the Connection profile, the Handle IPX parameter sets to N/A, but acts as if set to Server. How IPX bridged packets are handled
Handle IPX can be set to Server (IPX server bridging) or Client (IPX client bridging).
Netware t/o ("watchdog spoofing")
NetWare servers send out NCP watchdog packets to monitor client connections. Only clients that respond to watchdog packets remain logged into the server.
Example IPX client bridge (local clients)
In this example, the local Ethernet supports NetWare clients, and the remote network supports both NetWare servers and clients, so the MAX requires IPX client bridging. When Handle IPX=Client, the MAX applies a data filter that discards RIP and SAP periodic broadcasts at its WAN interface, but forwards RIP and SAP queries. That way, local clients can locate a NetWare server across the WAN, but routine broadcasts do not keep the connection up unnecessarily. 
Figure 8-4. An example IPX client bridged connection
Ethernet
      Mod Config
            Ether options...
                  IPX Frame=802.3
Ethernet
      Answer
            PPP options...
                  Bridge=Yes
                  Recv Auth=Either
EthernetNote: Enable Dial Brdcast to allow service queries to bring up the connection.
Connections
Station=SITEBGW
Active=Yes
Encaps=PPP
Route IPX=No
Bridge=Yes
Dial Brdcast=Yes
Encaps options...
Send Auth=CHAP
Recv PW=localpw
Send PW=remotepw
IPX options...
Handle IPX=Client
Figure 8-5. An example IPX server bridged connection
Ethernet
Mod Config
Ether options...
IPX Frame=802.3
Ethernet
Answer
PPP options...
Bridge=Yes
Recv Auth=Either
Ethernet
      Connections
            Station=SITEBGW
            Active=Yes
            Encaps=PPP
            Route IPX=No
            Bridge=Yes
            Dial Brdcast=Yes
            Encaps options...
                  Send Auth=CHAP
                  Recv PW=localpw
                  Send PW=remotepw
            IPX options...
                  Handle IPX=Server
                  Netware t/o=30
If an ARP packet contains an IP address that matches the Net Adrs parameter of a Bridge profile, the MAX responds to the ARP request with the Ethernet (physical) address specified in the Bridge profile, and brings up the specified connection. In effect, the MAX acts as a proxy for the node that actually has that address.
Copyright © 1998, Ascend Communications, Inc. All rights reserved.